2 Install Web API Service
This section covers how to install the GCS Web API Service on the main SG Communication Server.
IMPORTANT NOTICES ...
- The Web API Service is designed to run on the main Galaxy Communication Server.
- The Web API Service is installed as "manual start" when you execute Part-3A of the SG Software installation.
- You may need to configure the GCS Web API Service to "start automatically".
Installation Steps below ...
- The Web API Service installs during Part-3A of the Galaxy Install DVD (Disk-1).
- And the Database Server must also be up and running
- Of course you must have already installed Parts 1 and 2 as appropriate. .
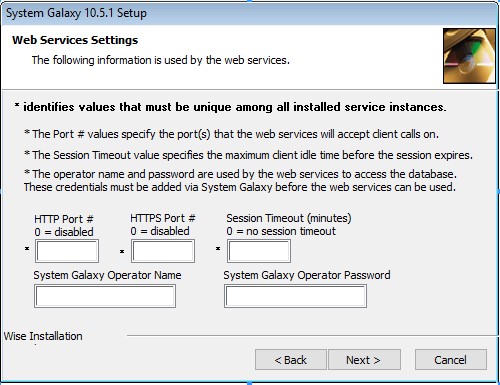
The Installer will launch. Provide the correct settings for each step including database connections.
You can accept default port numbers or change them as needed.
IMPORTANT: Do not use port 80 or 443 if you are using the Web Module, or other app thru IIS. Setting a Port# to "0" will disable it.
- Enter the desired value in [ HTTP Port # ] field. (8000 = default)
- Enter the desired value in [ HTTPS Port # ] field.(8443 = default)
- Enter a System Galaxy [Operator Name] and [ Password ].
.
Complete the installation steps as appropriate.
- Click [Finish] button.
/GCS Web API Service for Mobile App (SG 10.4.9)_3_5.png "finished")
OPTIONAL: If you need to make further adjustments after the installation, you can manually edit the config file in the WebServices folder.
GCS\System Galaxy\OptionalServices\WebServices
The "GCS.WebApi.WindowsService.exe.config" XML file is located in the WebServices folder.
-
Open the file and carefully edit the port number as needed.
/GCS Web API Service for Mobile App (SG 10.4.9)_3_6.png "Config File")
The Services screen displays GCS Web API Service.
If the Web API Service is set to "manual" start, you must change it to "automatic".
- Open the Services window & find the GCS Web API Service listed.
- Right-clicking on the service name and choose 'Properties'.
- In the properties, change the service to "Automatic" start.
- Save/Apply the changes and close the Properties screen.
- Right-click the service name again and choose “Start” or "Restart" from the menu to refresh the service.
- At this point you should restart the PC to initialize your changes.
/GCS Web API Service for Mobile App (SG 10.4.9)_3_7.png "Set Automatic Start")
END OF INSTRUCTIONS


